ADA Grab Bar Requirements, Height & Placement
The ADA grab bar requirements that matter at home — height, diameter, wall clearance, load rating — plus shower and toilet placement and the stud-blocking rules that separate a bar that holds from one that fails at the worst moment.
By Michael Chandler, Certified Aging-in-Place Specialist (CAPS) · Updated 2026-06-21
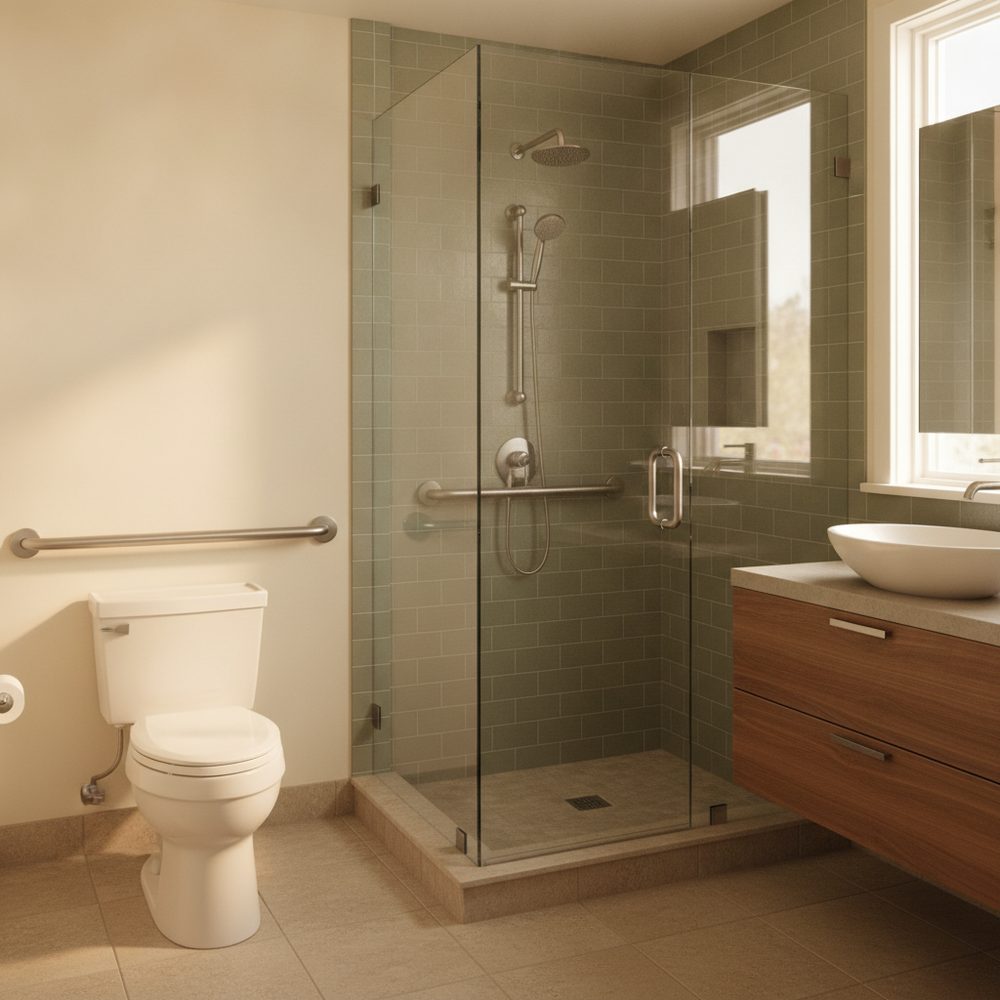
Shower grab bars should be mounted horizontally at 33–36 inches above the finished floor (to the centerline of the bar), with a second bar near the entry at 34–38 inches. Toilet grab bars go at the same 33–36 inch height — one 42-inch bar on the side wall, one 36-inch bar on the rear wall. Every bar must anchor into wall studs or solid blocking rated to hold a minimum 250-pound load. Getting the height and anchoring right is what makes a grab bar actually safe to use.
Grab bars are one of the most effective fall-prevention tools available for older adults aging in place. They are also one of the most misunderstood. A bar installed at the wrong height — or screwed into drywall with no structural backing — gives a false sense of security. The goal of this guide is to give you the correct numbers and the reasoning behind them, so you can make informed decisions about your home or your parent's home.
If you are in the Austin metro, the Hill Country, or anywhere in Central Texas and want a professional evaluation, our team offers free in-home safety assessments with no obligation.
ADA Grab Bar Requirements at a Glance
For an aging-in-place bathroom, an installation that follows the ADA grab bar requirements (ADA Accessibility Guidelines, section 609) hits these numbers:
- Mounting height: bar centerline 33–36 inches above the finished floor.
- Bar diameter: 1.25–2 inches outside diameter, so the hand can fully wrap the bar.
- Wall clearance: exactly 1.5 inches between the bar and the wall.
- Load rating: the bar and its anchoring must withstand a 250-pound force in any direction.
- Toilet: a 42-inch side-wall bar (extending at least 12 inches past the front of the toilet) plus a 36-inch rear-wall bar.
- Transfer shower (36×36 in.): a 42-inch bar on the back and control walls. Roll-in shower: bars on the back wall, control wall, and side wall.
- Anchoring: fasten into wall studs or solid blocking — never tile, backer board, or hollow-wall anchors alone.
ADA code is legally required in public buildings; for a private home it is the accepted best-practice standard. The sections below explain the reasoning behind each number, location by location — or jump straight to our professional grab bar installation.
Why Grab Bar Placement Matters More Than the Bar Itself
The American with Disabilities Act (ADA) Accessibility Guidelines (ADAAG) were written primarily for public buildings, but they draw on decades of occupational therapy research about how people actually move their bodies when standing, sitting, rising, and stepping. The heights in those guidelines translate well to residential settings because human biomechanics do not change based on whether you are in a hotel bathroom or your own.
A bar at the wrong height forces the user into an awkward angle. Someone reaching too far up or bending too far down to grip a bar cannot generate the controlled force needed for safe transfers. A bar at the correct height lets the arm, shoulder, and torso work together the way they were designed to.
Our grab bar and bathroom safety service includes an OT-informed layout assessment before we drill a single hole, so every bar goes exactly where it will do the most good for that specific person's height, mobility, and transfer style.
ADA Grab Bar Heights at a Glance
The table below summarizes the key measurements from ADA guidelines. These figures apply to the finished floor (tile or other flooring surface) and refer to the centerline of the grab bar, not the top or bottom edge.
| Location | Bar type / length | Height (centerline) | Key clearance / offset |
|---|---|---|---|
| Toilet — side wall | Horizontal, 42 in. minimum | 33–36 in. | 6 in. from toilet centerline to bar; bar extends ≥ 12 in. in front of toilet leading edge |
| Toilet — rear wall | Horizontal, 36 in. minimum | 33–36 in. | 12 in. to transfer side; 24 in. to opposite side of toilet centerline |
| Shower — side wall (bathing bar) | Horizontal, 24–36 in. | 33–36 in. | On the control wall or side wall; length depends on shower width |
| Shower — back wall | Horizontal, 36 in. minimum | 33–36 in. | Centered on shower seat (if present) or centered on shower pan |
| Shower / tub — entry | Vertical or angled (36 in.) | Grip zone: 34–38 in. | Positioned at the entry point to assist stepping in or out |
| Tub — side wall (long side) | Horizontal, 24 in. | 33–36 in. (near tub rim) | At or slightly above tub rim height to assist seated transfer |
| Bar-to-wall clearance (all locations) | — | — | 1.5 in. between bar and wall surface |
| Minimum load rating (all bars) | — | — | 250 lb in any direction (bar and mounting combined) |
Source: ADA Accessibility Guidelines (ADAAG), sections 609 and 610. Residential installations should follow these guidelines as best practice even when local code does not require it for single-family homes.
Shower Grab Bar Height and Placement
The horizontal bathing bar
This is the bar most people think of when they picture a shower grab bar — a horizontal bar on the side or back wall of the shower. Mount it at 33–36 inches above the finished floor, measured to the center of the bar. This height is within comfortable reach whether the user is standing upright or seated on a fold-down shower bench or transfer bench.
In a standard 36-inch-wide shower, a 24-inch bar on the side wall is a reasonable starting point. In a larger walk-in or roll-in shower, a 36-inch bar on the back wall gives more coverage. For a tub-to-shower conversion — one of the most common projects we do throughout the Austin metro and Hill Country — we typically install one bar on the side wall and one near the entry point. If you are considering converting your tub to a curbless shower, see our guide on walk-in and curbless shower options for details on how grab bars integrate into that design.
The entry bar
A separate bar positioned at the shower or tub entry helps with the most dangerous moment: stepping over a threshold. A vertical bar or a 45-degree angled bar installed at 34–38 inches above the floor at the entry point gives a secure handhold for that step. Many older adults find an angled bar more natural because it allows the grip to travel slightly upward as they step in, matching the natural movement of the arm.
Roll-in and curbless showers
Curbless or roll-in showers eliminate the threshold step entirely, but they still benefit from a full set of grab bars. ADA guidelines for roll-in showers call for a 36-inch bar on the back wall, a 30-inch bar on the control wall, and a 12-inch bar on the side wall. These bars support both ambulatory users who may feel unsteady and wheelchair users performing lateral transfers onto a shower seat.
Toilet Grab Bar Height and Placement
Falling while using the toilet is a more common bathroom hazard than most families realize. The combination of rising and sitting, often in a small enclosed space with slick floors, creates real risk — especially in the morning when joints are stiff. Properly placed toilet grab bars reduce that risk significantly.
Side bar (the most important one)
Mount a 42-inch bar horizontally on the side wall at 33–36 inches above the floor. The bar should sit 6 inches from the centerline of the toilet, and it must extend at least 12 inches past the front edge of the toilet bowl. That forward extension is important: it gives the user a handhold at the moment of standing, when the body's center of gravity is moving forward over the feet.
If only one bar can be installed, this is the one to prioritize.
Rear bar
A 36-inch bar on the wall behind the toilet at the same 33–36 inch height helps with the lowering phase — when a person with limited hip or knee strength needs to control their descent onto the seat. Mount it centered on the toilet, extending 12 inches toward the transfer side and 24 inches to the other side.
Comfort-height toilets and bar coordination
Standard toilet seats sit at roughly 14–15 inches from the floor. Comfort-height or ADA-height toilets sit at 17–19 inches. Because grab bar height is measured from the floor independently of the toilet, the same 33–36 inch bar height works for both. However, if a person is very short or very tall, slight adjustments within that range can improve usability. Our in-home assessments account for the individual, not just the code minimum.
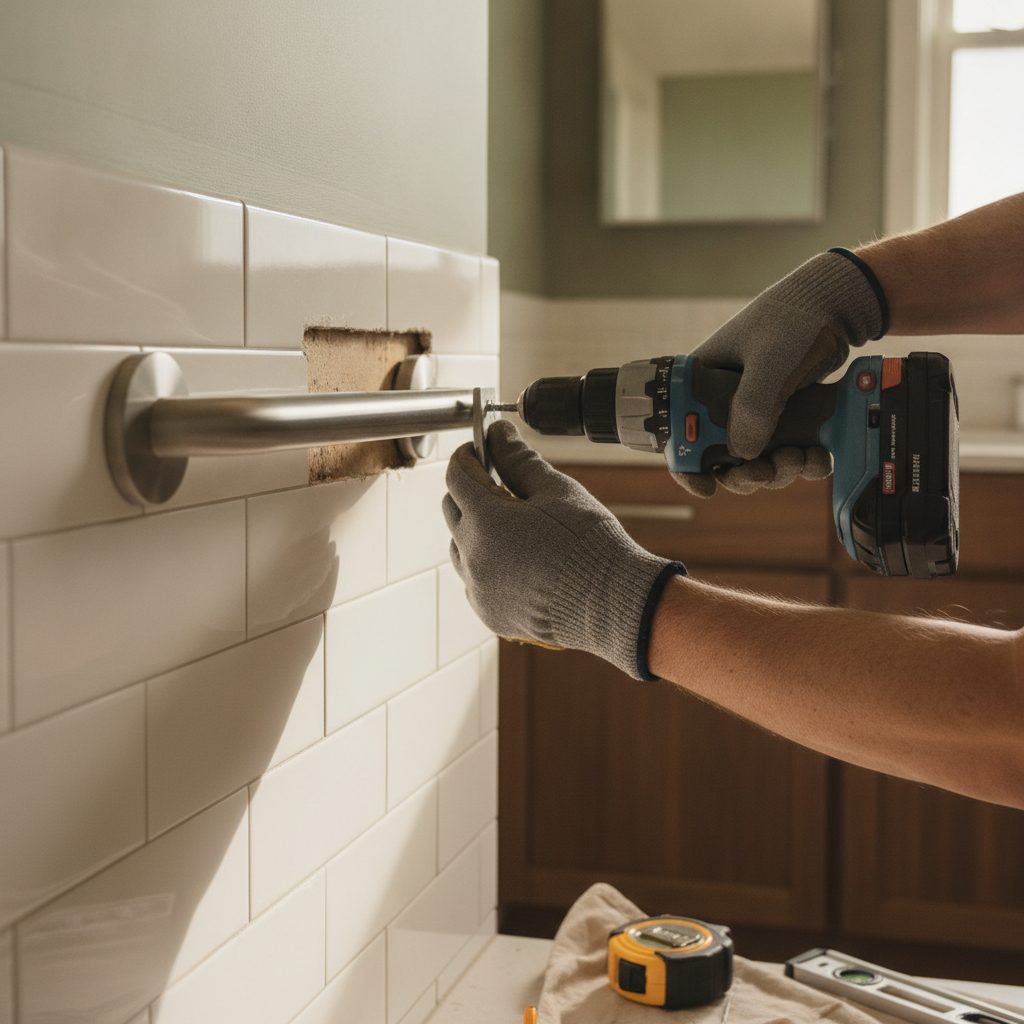
The 250-Pound Rule and Why DIY Installation Fails
The most dangerous grab bar is one that appears to be installed correctly but is not anchored into anything structural. When a person puts real bodyweight on a bar — especially during a stumble, when the force is sudden and sharp — the screws must hold against that full load without pulling free.
What the standard requires
ADA and ANSI A117.1 standards require grab bar mounting to withstand a minimum 250-pound load applied in any direction. That means pulling down, pulling out from the wall, and pushing sideways. Meeting this standard requires anchoring into one of two things:
- Wall studs — typically 2x4 or 2x6 lumber spaced 16 inches apart. Screws must go at least 1.5 inches into solid stud material.
- Solid blocking — a continuous piece of solid lumber installed horizontally between studs, flush behind the tile or wall surface. Blocking allows a bar to be mounted at any horizontal position, not just where studs happen to fall.
What DIY installations often miss
Common DIY anchoring mistakes include:
- Screwing only into cement board (HardieBacker) or greenboard drywall — neither of these materials can hold shear load on their own.
- Using toggle bolts or hollow-wall anchors in a wet area — these can hold light loads in a dry wall but corrode and fail in a shower environment over time.
- Hitting only the edge of a stud rather than its center, reducing holding strength significantly.
- Installing over existing tile without knowing what is behind it — older homes sometimes have no backer at all, or deteriorated backer from past water damage.
The professional difference
When our crew installs grab bars in a Central Texas home, we begin by confirming what is behind the wall. In new bathrooms where we control the full remodel, we install solid blocking across the entire expected bar zone before the tile goes up. In existing bathrooms, we use a combination of stud location, wall probing, and — where blocking is absent — a targeted wall repair to add blocking where it is needed. The tile is patched, matched as closely as possible, and regrouted. The result is a bar that will not budge.
Questions about your existing bathroom? We offer free in-home safety assessments throughout the Austin metro, Dripping Springs, the Hill Country, and surrounding Central Texas communities. We will check your walls, measure your space, and walk you through exactly what is needed — at no cost to you.
Bar Diameter, Finish, and Surface Texture
ADA guidelines specify that a grab bar's gripping surface must have an outside diameter of 1.25 to 2 inches. This range is calibrated to allow a full hand wrap with enough gap to generate grip force. Bars outside this range — either too thin (towel bars often are) or too thick — reduce control.
Surface texture matters in a wet environment. Smooth chrome bars are acceptable but can feel slippery to someone with reduced hand strength. Knurled or textured finishes provide better grip, particularly in a shower. Matte and brushed finishes are easier to maintain and show water spots less than polished chrome.
Do not substitute a towel bar for a grab bar. Towel bars are not load-rated, are typically narrower than the 1.25-inch minimum, and are mounted in locations chosen for aesthetics, not biomechanics. A towel bar that fails under load is worse than no bar at all, because it trains the user to reach for it and then is not there.
Planning a Full Bathroom Safety Upgrade
Grab bars are often the starting point for a broader bathroom safety review. Depending on what we find in a home, we may also discuss:
- Non-slip flooring or anti-slip treatments for tile surfaces
- Fold-down shower seats that let a person shower seated without taking up permanent space
- Comfort-height or ADA-height toilets that reduce the depth of the sit-to-stand movement
- Widened doorways if a wheelchair or walker needs easier access
- Tub-to-shower conversion to eliminate the tub step entirely
Our grab bars and bathroom safety service page covers our full process, from assessment to installation. For families thinking about a more comprehensive renovation, see our accessible bathroom remodel service for a full picture of what is possible.
Funding Options for Grab Bar Installation in Texas
Grab bar installation is relatively modest in cost compared to major remodels, but funding assistance is available for eligible individuals. Typical Central Texas ranges depend on the number of bars, the complexity of the anchoring situation, and whether blocking needs to be added — a free in-home assessment gives an exact quote for your specific home.
Funding programs that may help:
- VA HISA (Home Improvements and Structural Alterations) grant: Assists veterans with service-connected or nonservice-connected disabilities in modifying their homes for accessibility. Verify current VA figures at your regional VA office, as amounts are subject to change.
- Texas Medicaid STAR+PLUS HCBS waiver — Minor Home Modifications: This benefit can cover small modifications including grab bar installation for qualifying Medicaid recipients. Eligibility and benefit limits vary.
- Medicare Advantage: Original Medicare generally does not pay for grab bars or other home modifications. Some Medicare Advantage plans offer limited home safety benefits — check your specific plan details directly with your insurer.
- Area Agencies on Aging: Local AAA programs sometimes offer home modification assistance funded through the Older Americans Act. Contact your local AAA to ask about current programs in your county.
We help clients gather documentation and complete paperwork for these programs. This is not medical, legal, or financial advice — verify current program details and your own eligibility with the relevant agency.
For a deeper look at all available funding options in Texas, see our complete guide to home modification funding in Texas.
Step-by-Step: How a Professional Grab Bar Installation Works
-
1
In-home assessment
We visit your home, observe how you or your family member moves through the bathroom, take measurements, and identify wall construction. We note where studs fall, whether blocking exists, and whether the tile surface is solid. We also discuss your goals — are we addressing a specific concern, or taking a proactive approach to fall prevention?
-
2
Layout and product selection
Based on the assessment, we mark the precise locations for each bar. We select bar lengths, diameters, and finishes that match your existing hardware where possible. We confirm that the planned locations land on studs or blocking, or identify where blocking repair is needed.
-
3
Wall preparation and blocking (if needed)
If the wall behind the tile has no solid backing where the bar will mount, we open the wall at the required location, install solid blocking, retile, and regrout. We protect your floors and clean up daily — we treat your home with care.
-
4
Bar installation and load testing
Each bar is mounted at the correct height, with screws driven into studs or blocking. We apply bodyweight pressure to test the installation before we leave. We also walk the resident or family member through how to use each bar correctly.
-
5
Documentation
We provide a written summary of what was installed, where, and with what hardware — useful for insurance, VA paperwork, or future reference if a bar ever needs service.
Frequently Asked Questions
What are the ADA requirements for grab bars?
ADA grab bar requirements (ADA Accessibility Guidelines, section 609) are: mount the bar with its centerline 33–36 inches above the finished floor; use a 1.25–2 inch outside diameter; keep exactly 1.5 inches of clearance between the bar and the wall; and make sure the bar and its anchoring withstand a 250-pound load applied in any direction. Beside a toilet, use a 42-inch side-wall bar (extending at least 12 inches past the front of the toilet) plus a 36-inch rear-wall bar; in a 36-by-36-inch transfer shower, use a 42-inch bar on the back and control walls. These apply to public facilities by law and are the accepted best-practice standard for safe residential aging-in-place installations.
What height should a grab bar be in a shower?
ADA guidelines recommend a horizontal shower grab bar mounted at 33–36 inches above the finished floor, measured to the centerline of the bar. This height works for most adults whether they are standing or seated on a shower bench. A second bar near the entry point — vertical or angled at about 34–38 inches — helps with stepping in and out safely.
Where do grab bars go next to a toilet?
Place a 42-inch side bar at 33–36 inches above the floor on the wall beside the toilet, extending at least 12 inches in front of the toilet's front edge. Add a 36-inch rear bar behind the toilet at the same height, centered on the toilet and extending 12 inches toward the transfer side and 24 inches to the other side. Together these two bars support lowering, sitting, and rising movements.
Can I install grab bars into tile without blocking?
No. Tile, cement board, and standard drywall cannot support the shear forces of a person putting full weight on a grab bar. Bars must be anchored into wall studs or solid wood blocking installed behind the wall surface. If your walls do not have blocking, a professional can open the wall, install solid blocking rated for a 250-lb load, retile, and reinstall — ensuring a safe, code-compliant result.
How far from the wall should a grab bar be?
ADA guidelines specify a 1.5-inch clearance between the bar and the wall surface. This gap is essential — it lets a person wrap their fingers fully around the bar for a secure grip. Bars mounted flush to the wall or with less clearance are difficult to grasp and provide less control.
What weight rating do grab bars need?
ADA standards require grab bars to withstand a minimum 250-pound load applied in any direction. This means both the bar itself and the mounting must meet that rating. Professional-grade bars from reputable manufacturers list their load ratings on the product label. Equally important is the anchor point — studs or solid blocking must also be rated to handle that load without pulling loose.
Does Medicare pay for grab bar installation?
Original Medicare generally does not cover grab bar installation, as it is considered a home modification rather than durable medical equipment. Some Medicare Advantage plans offer limited home safety benefits — check your specific plan. Other programs that may help include the VA HISA grant for eligible veterans, and the Texas Medicaid STAR+PLUS HCBS waiver Minor Home Modification benefit. We help with paperwork; this is not medical, legal, or financial advice — verify current program details with the relevant agency.
What are the ADA shower grab bar requirements for a residential bathroom?
ADA Accessibility Guidelines (ADAAG section 609) specify that shower grab bars must: be mounted with the centerline at 33–36 inches above the finished floor; have an outside diameter of 1.25–2 inches; maintain 1.5 inches of clearance from the wall; and be capable of withstanding a 250-pound load in any direction. For a transfer-type shower (36 × 36 inches), a 42-inch horizontal bar is required on the side wall. For a roll-in shower, bars are required on the back wall and control wall. While ADA code applies to public facilities, these dimensions are the accepted best-practice standard for residential aging-in-place installations as well.
Ready to Make Your Bathroom Safer?
Our CAPS-certified team serves Austin, Dripping Springs, Georgetown, Kyle, Wimberley, Canyon Lake, Marble Falls, and communities throughout Central Texas. A free in-home assessment costs you nothing and gives you a clear picture of what your home needs.
Licensed & Insured · CAPS-Certified · No obligation · We protect your floors and clean up daily